How to Display AdSense Ads only on Post Pages

Do you want to insert AdSense ads into your Blogger blog without showing them on the homepage? This tutorial explains how to display AdSense ads only on post pages of your blog. Following the steps given here you can insert ad code to the top or bottom of your post title or post content.
1.Generate parsed code of your AdSense code because we cannot put AdSense code directly into the Blogger xml. So parse it using AdParser.
Now your ad code will look like this:
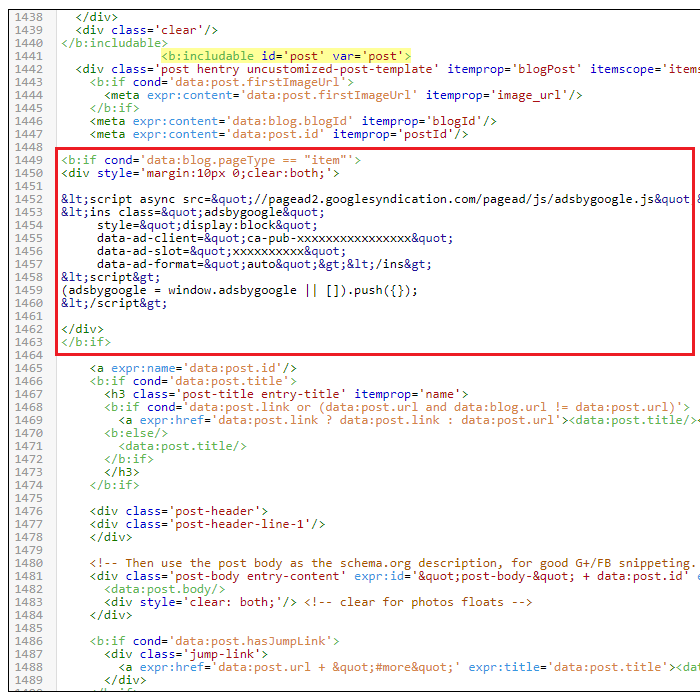
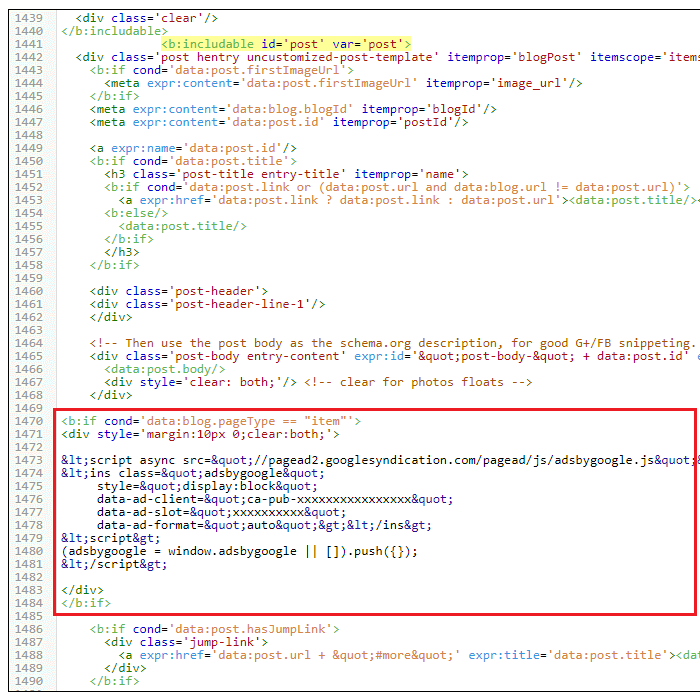
this:
HTML Parser

2.Go to "Edit HTML" of your blog. Find this line:

<b:includable id='post' var='post'>

Above line is the starting point of the code block which is responsible for displaying your posts. We need to add our ad code into this code block.

3.You should add your AdSense code like this:

<b:if cond='data:blog.pageType == "item"'>
<div style='margin:10px 0;clear:both;'>

ADD-YOUR-ADSENSE-CODE-HERE

</div>
</b:if>
Replace "ADD-YOUR-ADSENSE-CODE-HERE" with your parsed ad code.

How to Display Ads Above Post Title

To display advertisements above your post title, add your ad code like this:
AdSense Above Post Title Code

How to Display Ads Below Post Title

To display advertisements below your post title, add your ad code like this:
AdSense Below Post Title Code
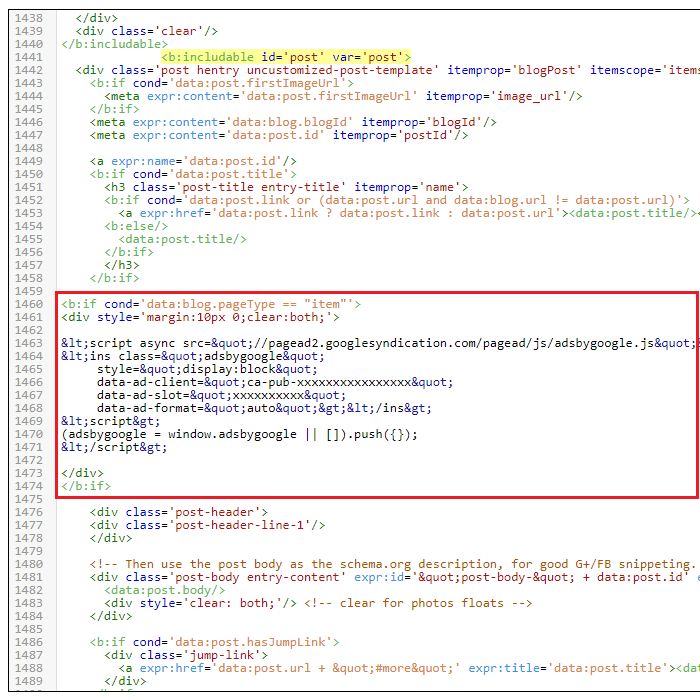
Note: Adding advertisement directly below post titles is not recommended.

How to Display Ads Above Post Body

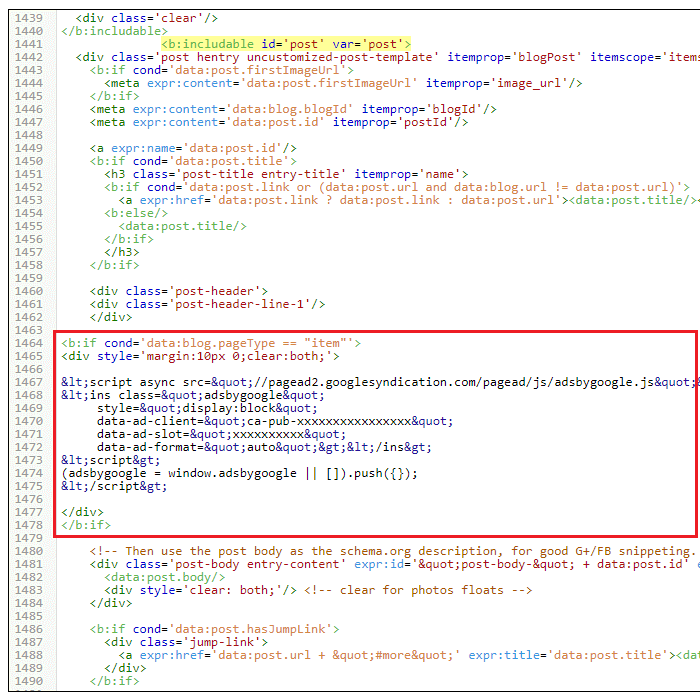
To display advertisements above your post's content, add your ad code like this:
AdSense Above Post Body Code

How to Display Ads Above Post Body

To display advertisements below your post's content, add your ad code like this:
AdSense Below Post Body Code
Note: Above codes can be slightly different according to the template you are using.
Share:

How to Activate HTTPS on Blogger Custom Domains

Few days ago, Blogger added a long-awaited feature for custom domains. Now Blogger offers you the opportunity to test the HTTPS protocol for blogs with a custom domain.
1. To make the HTTPS option available for your blog, go to the user settings and switch to Blogger draft.
Dashboard ► Settings ► User Settings ► General ► Use Blogger Draft ► Yes.
Since then, the HTTPS option will be available for your blog.
2. Now go to Dashboard ► Settings ► Basic ► HTTPS.
3. Change "HTTPS Availability" to "Yes" and wait few minutes until Blogger generate a SSL certificate for your domain.
Blogger HTTPS Availability for Custom Domains
4. After that you can see the HTTPS Redirect option for your custom domain. change "HTTPS Redirect" to "Yes".
Blogger HTTPS Redirect Option for Custom Domains
Now you have successfully activated a SSL Certificate / HTTPS for your blog with a custom domain.
According to a Blogger developer:
Due to the large number of custom domain blogs, Blogger will gradually and safely launch the feature into the default interface starting in the first quarter of 2018.Copyright © 2017  www.bloggert
Share:

How To Configure Responsive Slider


This tutorial is for configuring the responsive slider you can see on my blogger themes.
Responsive Slider
To  setup this featured image slider with your content you need to visit "Edit HTML" page of your blog.
Find this line:

<!-- Featured Content Slider Started -->

There are 5 slides in the  slider. Each slide code is wrapped by <li> and </li>. Look at the example code below. It is the first slide code of one of my theme:
<!-- Slide 1 Code Start -->
<li>
	<a href='ENTER-SLIDE-1-LINK-HERE'><img src="https://blogger.googleusercontent.com/img/b/R29vZ2xl/AVvXsEhWdP6q8ZmGLaiL3I6bWzTnXCd0OyYUBax_A3mr_-hbg2c2FxG3G2b-c3Ive3HjunuAGalbaHkeHcBmGbl_VKWMO4sjkXd8j5wm7dwiShYcHLMue9db-2qgWIUgpt76Lv2hJSs7H4pXYqQ/s1600/1.jpg"/></a>
	<div class="flex-slideinfo">
		<h3><a href='ENTER-SLIDE-1-LINK-HERE'>This is default featured slide 1 title</a></h3>
		<p>Go to Blogger edit html and find these sentences.Now replace these sentences with your own descriptions.This theme is Bloggerized by Lasantha Bandara - Premiumbloggertemplates.com.</p>
	</div>
</li>
<!-- Slide 1 Code End -->
Now replace,
  • "This is default featured slide 1 title" with your featured post title.
  • "ENTER-SLIDE-1-LINK-HERE" with your featured post URL.
  • "Go to Blogger edit html and find these sentences.Now replace these sentences with your own descriptions.This theme is Bloggerized by Lasantha Bandara - Premiumbloggertemplates.com.
  • "https://blogger.googleusercontent.com/img/b/R29vZ2xl/AVvXsEhWdP6q8ZmGLaiL3I6bWzTnXCd0OyYUBax_A3mr_-hbg2c2FxG3G2b-c3Ive3HjunuAGalbaHkeHcBmGbl_VKWMO4sjkXd8j5wm7dwiShYcHLMue9db-2qgWIUgpt76Lv2hJSs7H4pXYqQ/s1600/1.jpg" with your slider image.
Now we have configured the first slide. Final slide code will look like this:
<!-- Slide 1 Code Start -->
<li>
	<a href='http://www.bloggertipandtrick.net/how-to-remove-blogger-navbar/'><img src="http://www.bloggertipandtrick.net/wp-content/uploads/2009/03/hide-blogger-navbar.png"/></a>
	<div class="flex-slideinfo">
		<h3><a href='http://www.bloggertipandtrick.net/how-to-remove-blogger-navbar/'>How To Remove/Hide Blogger Navbar</a></h3>
		<p>Don't you like to keep the default Navbar in your Blogger blog? This tutorial will show you how to quickly remove/hide blogger navbar from your blog.</p>
	</div>
</li>
<!-- Slide 1 Code End -->
There are another 4 slide codes you have to configure like this.
Share:

How To Upload/Install a Blogger Template

This article have explained how to upload a blogger template into your blog. If you faced to an unexpected error when trying to install a template contact me, I will upload that template into your blog. Also if you have problems like undeletable widgets, layout not displaying correctly,.. contact me for fast support.
First download your new blogger template to your computer. If the template is contained in a zip file, ensure you have extracted the XML template.
1. Login to your Blogger Account.
2. Click on your blog name.

Click on Your Blog Name
You can see overview of your blog.
3. Click on "Template".
Click on Template
4. Click on "Backup / Restore" button.
Click on Backup Restore button
"Backup / Restore" window will appear.
Backup Restore Template
5. Browse your template file (XML file) and click open.
Select XML template file
6. Finally click on "Upload" button.
Click on Upload Button
You are done.
Uploaded Successfully Message
Go to "Layout" to rearrange your  widgets positions correctly.
Share: